OneTouch v2
OneTouch v2 comes with a number of improvements in terms of both user experience, accessibility and security.
To enable it in PAS, simply follow the guides below.
Configuration
Configuring PAS to use OneTouch v2 is simple and described in detail below. Details to note are that once you enable OneTouch v2, enrollment from OneTouch v1 will no longer be possible.
By default, authentication via previously enrolled OneTouch v1 profiles will not be possible. You may however enable a
compatibility mode that enables both OneTouch v1 and v2 to authenticate, to give time for users to swap over to v2. This is
not recommended to use long term however, as v2 comes with security updates it is better to only allow OneTouch v2 to authenticate.
So once your users have enrolled in OneTouch v2, you the compatibility mode should be disabled. It is activated in the PKI
module, via the config parameter allowOTCompatibilityMode, see the example from the configuration guide below.
From a completely fresh installation (no prior config file)
If installing PAS completely fresh without any existing configuration, simply go through the steps of the guide scenario "OneTouch" in the configuration gui, under the "System"-tab, and select "v2" on the "OneTouch version" selector.
From an existing config file
Since OneTouch v2 uses Elliptic Curve (EC) keys, we need to adjust our CA_CONFIGURATIONS to enable the usage of such keys
in the certificate provisioning. In your phenix-store.json, go to CA_CONFIGURATIONS and add the following entry to the
list ca_profiles:
{
   "id":"f05130a6-0962-426f-bf4f-d7b50edeaf11",
   "name":"PhenixID One Touch 2.0",
   "alias":"onetouch-v2",
   "description":"Profile for PhenixID One Touch 2.0 client certificates",
   "pipe_ref":"<replace-with-pipe_ref-from-default-profile>",
   "issue_pipe_ref":"<replace-with-issue_pipe_ref-from-default-profile>",
   "revoke_pipe_ref":"<replace-with-revoke_pipe_ref-from-default-profile>",
   "rules":{
      "subject":{
         "regex":"^CN=.*",
         "required":"true"
      },
      "key":{
         "size":"256",
         "algorithm":"EC",
         "values":{
            "size":"256",
            "algorithm":"EC"
         }
      },
      "key_usage":{

      },
      "not_before":{
         "value":"now"
      },
      "not_after":{
         "value":"duration:P365D"
      },
      "extensions":{

      }
   }
}
The values for pipe_ref, issue_pipe_ref and revoke_pipe_ref should be replaced with their respective values in the other profile,
the one with the default alias. Once you have done this step, you may run the OneTouch config guide as described above in the
"fresh installation" step. If you have already created a OneTouch guide prior to adding this CA Profile, you will need to add the
configuration parameter ca_profile to the PKI module configuration, and it should have the value of the OneTouch v2 CA profile. Example:
{
    "name" : "com.phenixidentity~phenix-pki",
    "enabled" : "true",
    "config" : {
      "version" : "v2",
      "allowOTCompatibilityMode" : "true",
      "issuer" : "PhenixID",
      "ca_ref" : "2ea75745-de9d-44f1-824e-2d7bf55028bb",
      "ca_profile" : "f05130a6-0962-426f-bf4f-d7b50edeaf11",
      "url_prefix" : "http://192.168.178.61:8080",
      "actions_url" : "http://192.168.178.61:8080",
      "http_configuration_ref" : "97603ca3-2eca-4771-ad6b-f244bf96ce35",
      "guide_ref" : "799e57a4-63f3-4d0f-a6f2-6bc4451ed795",
      "guide_id" : "guides.onetouch"
    },
    "created" : "2024-10-01T13:48:40.537Z",
    "id" : "cc78f900-fc81-400b-b107-3a4a9bbc2507",
    "modified" : "2024-10-01T13:48:55.664Z"
}
Other configuration settings
There are a few configuration parameters available for OneTouch v2, a few at the enrollment level and a few
at the authentication level.
Enrollment specific settings
Note that these are the parameters that control the behavior of profiles at the time of enrollment. Changing this later will not change the enrolled profile. More configuration settings (such as display name) are described further down in the article, and are configured elsewhere.
The global enrollment specific settings are:
| Name | Description | Default value |
|---|---|---|
| biometric_auth_allowed | Controls if the enrolled profile is allowed to activate biometric authentication instead of PIN code. | true |
| max_incorrect_pin_attempts | Controls the max amount of incorrect pin attempts before the profile is revoked and deleted. | 5 |
| pin_length | The required length of the pin codes supplied in the OneTouch app when enrolling | 4 |
Those are configured at the pki module in the MODULES bucket in the advanced configuration. See example below:
{
    "name" : "com.phenixidentity~phenix-pki",
    "enabled" : "true",
    "config" : {
      "version" : "v2",
      "allowOTCompatibilityMode" : "true",
      "issuer" : "PhenixID",
      "ca_ref" : "2ea75745-de9d-44f1-824e-2d7bf55028bb",
      "ca_profile" : "f05130a6-0962-426f-bf4f-d7b50edeaf11",
      "url_prefix" : "http://192.168.178.61:8080",
      "actions_url" : "http://192.168.178.61:8080",
      "http_configuration_ref" : "97603ca3-2eca-4771-ad6b-f244bf96ce35",
      "pin_length": "4",
      "biometric_auth_allowed": "true",
      "max_incorrect_pin_attempts": "5",
      "guide_ref" : "799e57a4-63f3-4d0f-a6f2-6bc4451ed795",
      "guide_id" : "guides.onetouch"
    },
    "created" : "2024-10-01T13:48:40.537Z",
    "id" : "cc78f900-fc81-400b-b107-3a4a9bbc2507",
    "modified" : "2024-10-01T13:48:55.664Z"
}
Authentication specific settings
Authentication specific settings are configured at the authenticator level (see examples below). Configurable settings are:
| Name | Description | Default value |
|---|---|---|
| biometric_auth_allowed | Controls if the authentication flows allows biometric authentication instead of PIN code. | true |
| authIntent | A short string describing the intent of the authentication. Example: 'Login to SomeIDP'. | |
| authMessage | A short message presented in the OneTouch app. Supports basic markdown. | |
| authMessageB64 | A base64 encoded short message presented in the OneTouch app. Supports basic markdown. Overrides 'authMessage' config parameter. |
Examples:
OneTouch (HTTP) via QR code:
{
    "id" : "fb0b7088-d4bc-4f16-963f-c967516774a8",
    "alias" : "onetouch",
    "name" : "AnonymousAssignmentAgnostic",
    "displayName" : "OneTouch",
    "configuration" : {
      "localizationKey" : "oneTouch",
      "pipeID" : "55450ccd-96e4-4577-94d6-8c8e05b3e6e6",
      "issuer" : "PhenixID",
      "biometric_auth_allowed" : "true",
      "authMessageB64" : "aGVqc2FuMjI=",
      "authIntent" : "Log in at {{request.contextrequestissuer}}",
      "setSSOParameters" : "true"
    }
  }
OneTouch via RADIUS
{
    "name" : "OneTouchAuthenticator",
    "config" : {
      "uid_pwd_pipe" : "3d6e076f-1317-4a9f-a360-3ea576414607",
      "clientIP" : "127.0.0.1",
      "ar_attributes" : "",
      "resp_attributes" : "",
      "secret" : "{enc}I1eWp1ku1KvD5NF4LXiTxmKWNFlWWuiU8nKX0XA87CY=",
      "radius_config" : "59b95ed9-16fa-409c-a42f-d8aeb66eb163",
      "remove_ad_domain" : "false",
      "poll_interval" : "3000",
      "max_polls" : "10",
      "notify" : "true",
      "user_retry_timeout" : "20",
      "clientTemplate" : "ot_auth_template",
      "servicename" : "PhenixID",
      "ot_alert_title" : "Login",
      "ot_alert_message" : "Open and confirm to complete the login",
      "ot_alert_message_mapping_table" : "",
      "biometric_auth_allowed" : "true",
      "authMessageB64" : "aGVqc2FuMjI=",
      "authIntent" : "Log in at some other service"
    },
    "created" : "2025-05-15T07:19:33.014Z",
    "id" : "b762dc78-0145-4a2e-9719-9b9fc7b9476b"
  }
Adding a first and last name to the profile
When enrolling in OneTouch v2 you may set first and last names that will be visible besides the unique username in the OneTouch app.
This is enabled by default, but you may control this manually via the add_user_display_name attribute. You can set this to false to disable this.
There are several ways to enroll to OneTouch, but the configuration is the same whether it is done via OneTouch enrollment portal, SelfService, or MFA Admin.
In either of those module configurations, control it via "add_user_display_name" : "true/false", and if true (or default) the first name and last name will be taken from the
attributes givenName and sn, if those are available. You may change what attributes are used via the config parameters
user_first_name_attribute and user_last_name_attribute respectively. Example of a OneTouch enrollment portal with
the setting enabled:
{
    "name" : "com.phenixidentity~phenix-prism-enroll-pki",
    "enabled" : "false",
    "prism_enabled" : "true",
    "config" : {
      "display_name" : "guides.enrollpki.title",
      "base_uri" : "pki",
      "http_configuration_ref" : "33da9e98-78cd-4132-81e3-0359decdd35b",
      "requires_role" : "auth:d513ddd7-0aa3-4ba9-b0d7-474f9a1051d5",
      "use_push" : "true",
      "token_max_count" : "",
      "enroll_oath" : "false",
      "module_base_url" : "/tokens/pki",
      "enroll_timeout_mins" : "5",
      "enroll_pollinterval_ms" : "2000",
      "add_user_display_name": "true",
      "user_first_name_attribute": "customFirstNameAttribute",
      "user_last_name_attribute" : "customLastNameAttribute"
    },
    "guide_ref" : "4b88d632-becf-401e-b1b3-f83f4c70a816",
    "guide_id" : "guides.enrollpki",
    "created" : "2024-09-26T14:36:53.729Z",
    "id" : "49a5ad77-1e5b-4b43-bad9-70747183d7dd"
}
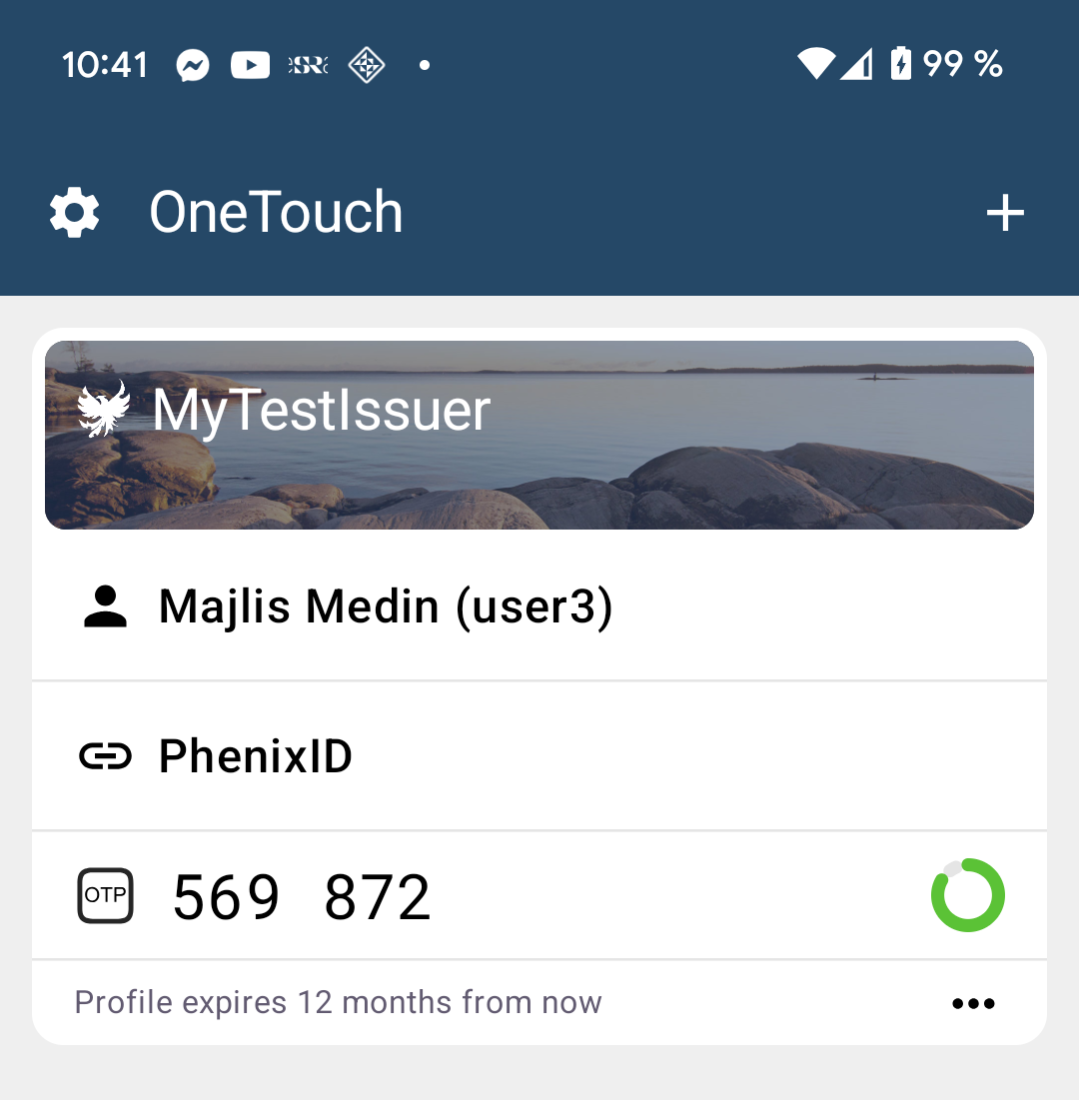
Branding
The PAS administrator has the possibility to control some branding of the PhenixID OneTouch app, more specific the look and feel of the OneTouch profile cards.

Branding setting is managed in PhenixID PAS server and downloaded to the mobile application on the following occasions
- When enrolling a profile
- Each time the application is restarted (if internet connection is available)
Add branding settings
Prerequisites
In order to add branding to PhenixID OneTouch, the images used need to be available on a web server which can be reached publicly. Also, a settings file containing pointers to the images must be created and added to a web server and exposed publicly.
Settings file data format
The settings file is in json format and must be named "settings.json".
Please note that the images are cached in the client devices in order to save mobile network downloads. In order to make the client devices update images from the server the URL must change. It is recommended to add a parameter like “?v=1” which is incremented when an image is changed. See example below.
An example:
{
    "image_background_landscape": "https://demo.phenixid.net/otsettings/landscape.jpg?v=1",
    "image_icon": "https://demo.phenixid.net/otsettings/logo.jpg?v=1"
}
Images
Images should be the size specified below, and in JPEG, PNG, GIF, WebP, BMP or HEIF format.
Images will be scaled to fit the destination on screen so that both dimensions (width and height) of the image will be equal to or less than the corresponding dimension of the destination.
Description of the parameters:
| Parameter | Description | Size in pixels |
|---|---|---|
| image_background_landscape | The background image at the top of the profile card | 1280 x 720 |
| image_icon | The issuer icon next to the issuer name at the top pf the profile card | 64 x 64 |
Configuring
Use the settings file by entering the URL to the settings file in the PhenixID PAS configuration.
Note that this URL must be reachable by the apps at the time of activation.
The URL must be set for the application(s) used for app activation. See details below.
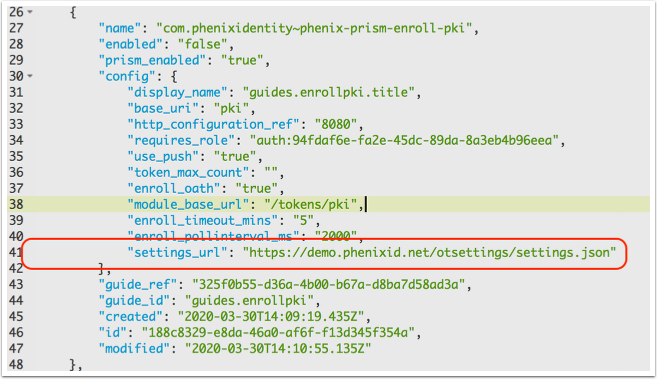
OneTouch enrollment application
- Login to Configuration Manager
- Open the Advanced tab
- Open the Modules section
- Locate the enroll-pki section
- Add the settings_url to the configuration block.
Testing
Test it by activating PhenixID OneTouch, using the activation application(s) configured (see above).
Verify that the App displays the images defined in the settings file.
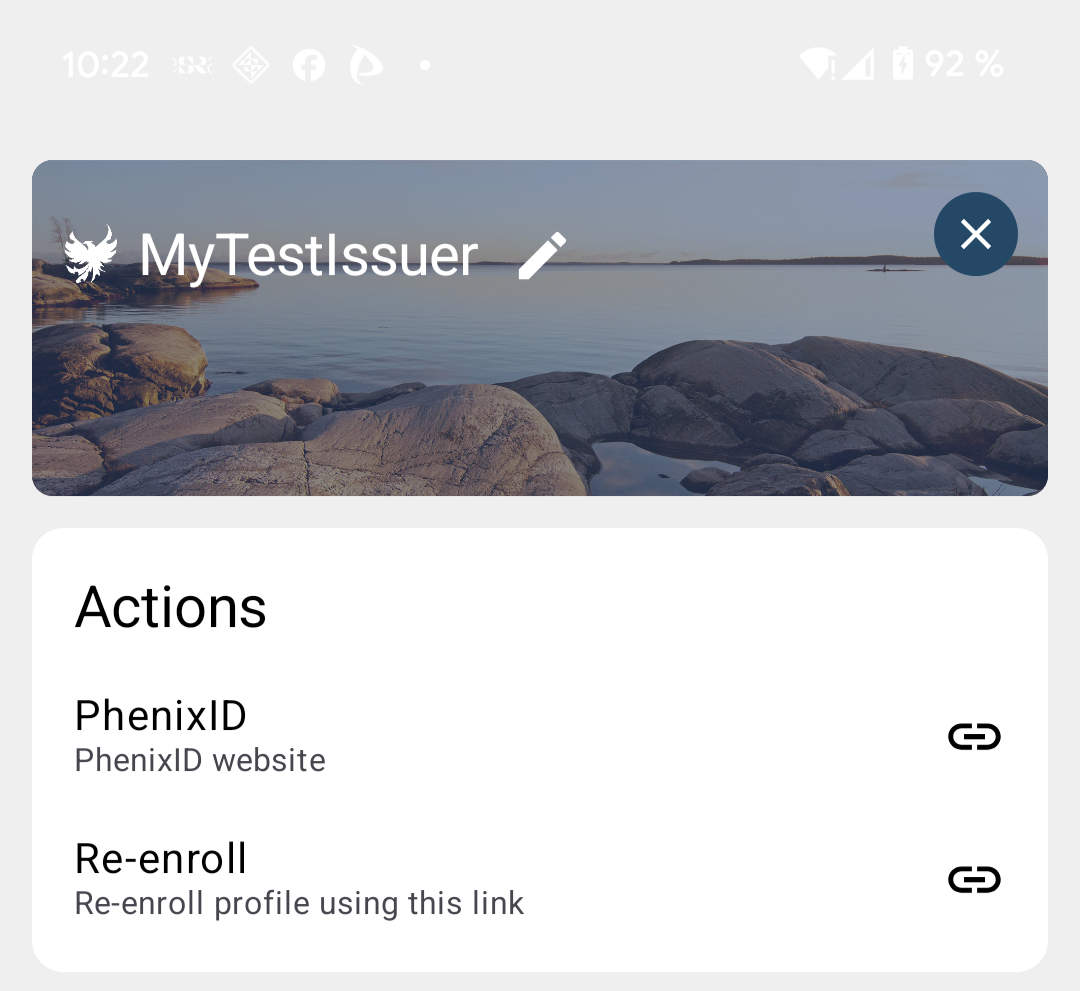
Actions
The PAS administrator can configure a number of actions that appear as buttons in the OneTouch apps. When the user click an action button the configured URL is opened in the default browser.
Configuring
| Parameter | Description | Required |
|---|---|---|
| type | Controls where the button is placed in the app | yes |
| url | URL opened in default browser when button is clicked | no |
| title | Title of the action | yes |
| icon | base64 encoded button icon (64 x 64 pixels) | no |
| text | Description of action | yes |
| authentication | "JWT" in case user must authenticate browser request | no |
The following types of actions are supported:
| Type | Description |
|---|---|
| open | Button will only be listed in profile's details view. |
| update_profile | URL is opened in default browser when user select to update the profile. |
| card | Button will be displayed in the profile's card view. |
| myapps | Button will be displayed in the profile's card view together with a myapps icon. |
| profile_info | Title is used as issuer name. |
Example Actions configuration:
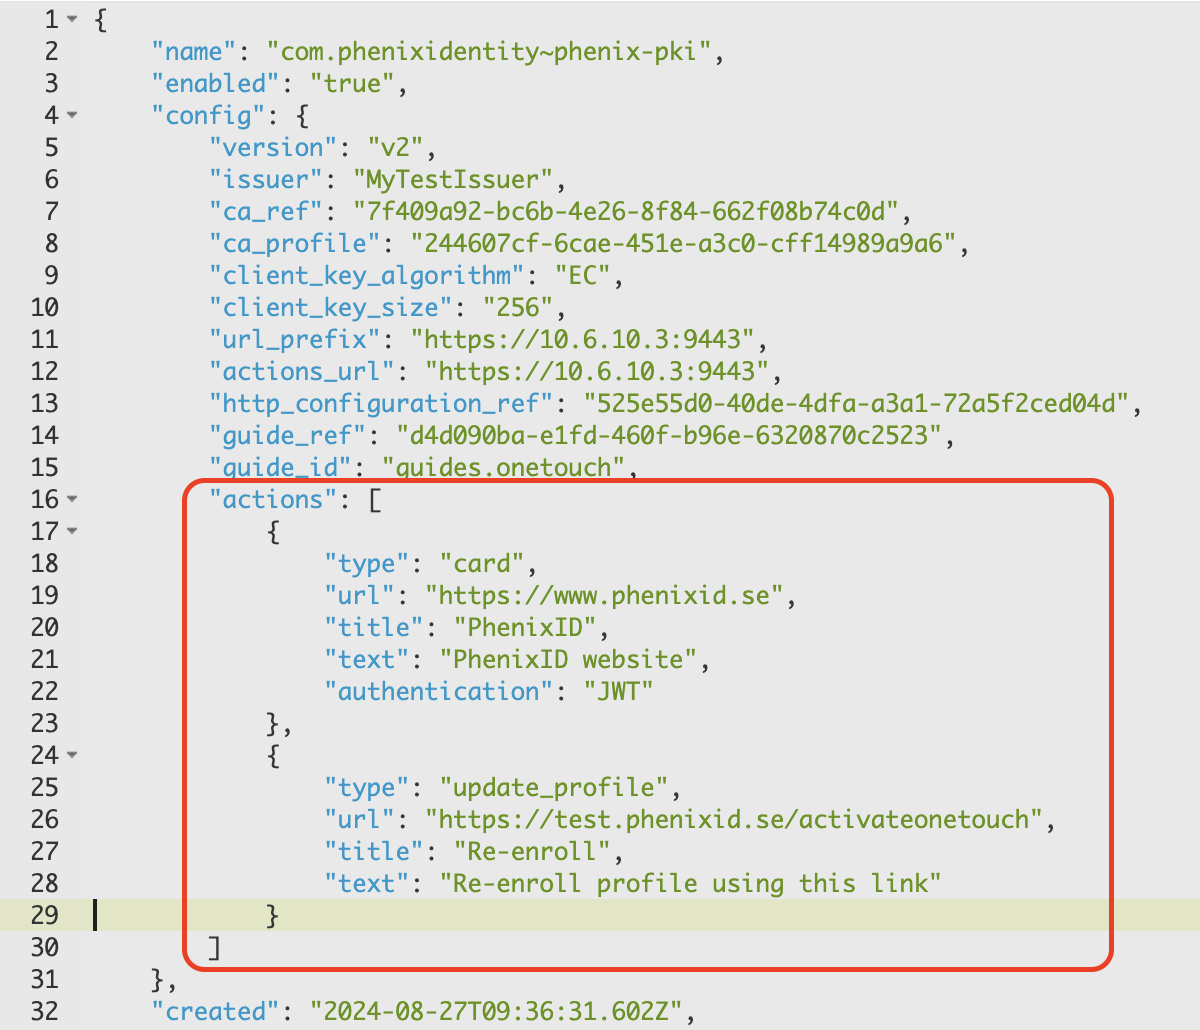
Example "PhenixID" action displayed on profile card:
All actions are listed in the profile's detail view:
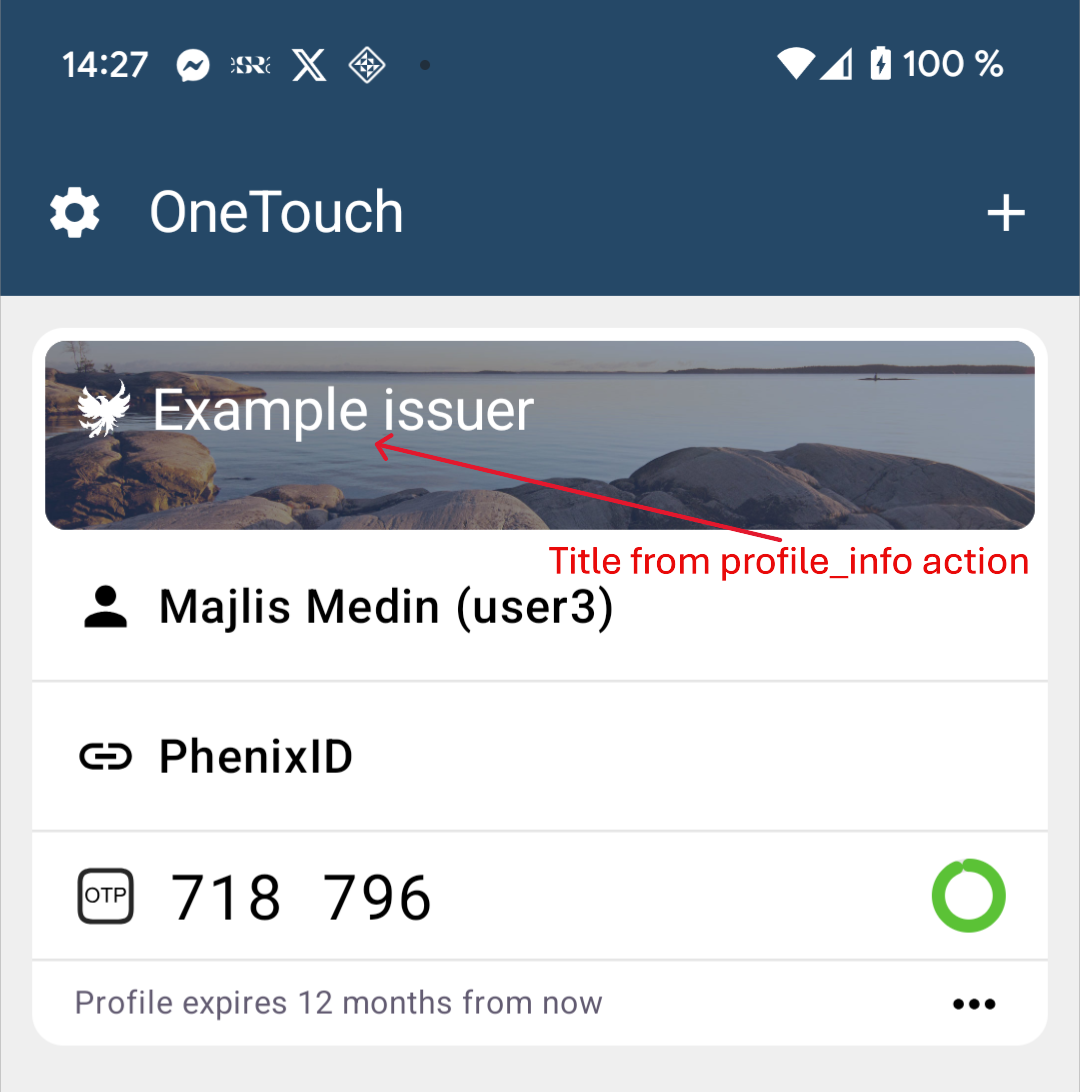
Special action type "profile_info"
The issuer of the profile is retrieved from the certificate that belong to the profile. However, sometimes this issuer name can be hard to understand by the user.
To set the issuer name of the profile add this action configuration to PAS. The title parameter of the action will be put at the top of the profile card.
{
  "type": "profile_info",
  "title": "Example issuer",
  "text": "Our issuer name"
}