Azure B2C MFA and SSO with PhenixID Authentication Services
Warning
Please note, this document is using the legacy authenticators - in order to use the new protocol agnostic authenticators, you need to apply relevant modifications to the configuration examples outlined in this article.
Summary
This document will guide you through the steps to enable multi-factor authentication and Single Sign-On for Azure B2C.
System Requirements
- PhenixID Authentication Server 2.8.1 or higher
- Keystore file (p12) to sign tokens
- Azure B2C administrator account
- Reverse proxy http server (such as Apache) set up in front of PhenixID Authentication Services
Instruction
Overview
This document will guide you through the steps to enable multi-factor authentication and Single-Sign on for Azure B2C.
PhenixID Server acting as OpenID Connect Provider (OP)
- Open Configuration Manager
- Setup PhenixID Authentication Services as an OpenIDConnect Provider (OP) with Authorization Code Flow. For more info about OpenID Connect Authorization flow with PhenixID Authentication Services, see this article OpenID Provider
- Configure the token endpoint pipe to return both id_token and access_token to the RP.
- Configure the token endpoint pipe to populate the id_token with these claims (change mapping if needed, also change the iss claim):
"scope_claims" : [ {
  "name" : "openid",
  "claims" : [ {
    "name" : "given_name",
    "item_property_name": "givenName"
  },{
    "name" : "name",
    "item_property_name": "fullName"
  },{
    "name" : "familyName",
    "item_property_name": "sn"
  },{
    "name" : "name",
    "item_property_name": "fullName"
  },
   ]
}]
Click on Advanced -> OIDC_RP
Add new RP. Example:
{
  "id": "azB2c",
  "name": "Azure B2C OpenID Connect RP",
  "displayName": "Azure B2C OpenID Connect RP",
  "password": "abcd1234",
  "allowedRedirects": [
    "https://phenxidb2c.b2clogin.com/phenxidb2c.onmicrosoft.com/oauth2/authresp"
  ]
}
Change password (client_secret) and allowedRedirects to suite your Azure B2C environment.
Click on Advanced->Modules
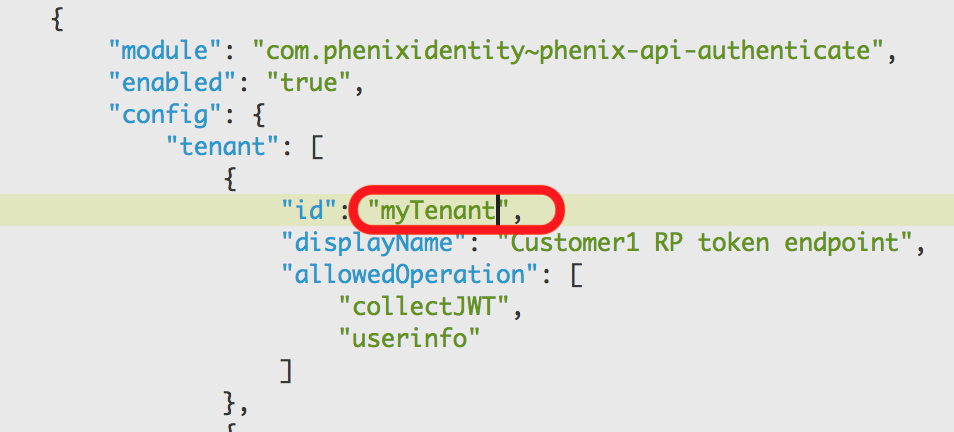
Fetch the tenant value you are using from the authentication-api module. Example:
Open the token endpoint pipe
Find the GenerateJWTTokenVavle -> keystore config param
Find the keystore in the Advanced configuration
Extract the public certificate from the keystore. Save it in PEM format.
Construct JWKS json string for the extracted certificate, using this guide.
Take the resulting jwks json string and save it to a textfile named “keys”. Place the textfile on your http reverse proxy server in the folder /oidc/<tenant_name> to be publicly accessible from any web browser.
Configure the file to be content-type=application/json.
Click Stage Changes and Commit changes
Construct OIDC .well-known discovery json data using this guide. Pick the jwks url from step 9 and set it as jwks_uri.
Save the resulting json to a file named openid-configuration.
Place the file on the http reverse proxy server.
Place it in the folder
oidc/<tenant>/.well-knownto be publicly accessible from any web browser.Configure the file to be content-type=application/json.
Configure Azure B2C
- Login to Azure B2C as an administrator (for your domain)
- Click All Services and search for “Azure AD B2C”
- Click Azure AD B2C -> Identity Providers
- Click Add Identity Provider
- Set a name of the new Identity Provider
- Select type = Custom Identity Providers -> OpenID Connect
- Enter values for the Identity Provider:

Metadata url = The .well-known URI from previous step
Client id = The OIDC RP id value from previous step
Client secret = The OIDC RP password value from previous step
Scope = openid
Response type = code
Response mode = query
Domain hint = Optional value to be able to skip the Provider selection page when signing in. Set to any value of your choice. (Example: phenixid_azB2c)
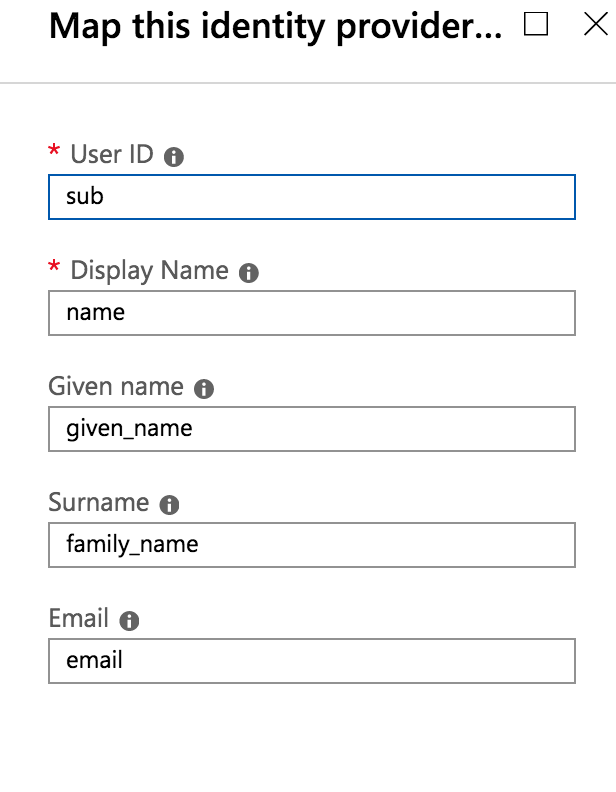
Add claims mapping for the added Identity Provider:
Test
- Login to Azure B2C as an admin
- Click All Services and search for “Azure AD B2C”
- Click Azure AD B2C -> Identity Providers
- Add a user flow where the newly added Identity Provider is responsible for login
- Click Run user flow
- You should now be redirected to the Identity Provider
- Authenticate with a test user
- You should now be redirected to Azure B2C
- Sign-up page should appear (only at first login)
- Test user is now logged in