Make your IIS application SAML aware by using Shibboleth SP and PhenixID Authentication Services
Warning
Please note, this document is using the legacy authenticators - in order to use the new protocol agnostic authenticators, you need to apply relevant modifications to the configuration examples outlined in this article.
Summary
This document will guide you through the steps to enable multi-factor authentication and Single-Sign On for web based applications on IIS with server variables by using Shibboleth SP.
System Requirements
- PhenixID Authentication Server 2.0 or higher
- IIS server installed
- The IIS server must be reached from clients and IDP over HTTPS (443).
- Make sure the IIS server has a binding for https on localhost
Instruction
Overview
This document will guide you through the steps to enable multi-factor authentication and Single-Sign on for server variable aware web applications.
PhenixID Authentication Server acting as SAML IdP
Setup PhenixID Authentication Services as a SAML IdP.
Verify your SAML IdP metadata by going to the URL:
https://<YourServerDomainName>/saml/authenticate/<authenticator_alias>?getIDPMeta?If needed, download the metadata to a xml file.
Configure Shibboleth SP
Install Shibboleth SP
- Download the latest version of the Windows installer package from the Shibboleth Project site, selecting the appropriate install file directory for your system. You will need to download the .msi file.
- Run the appropriate installer, accepting the default settings. When the installer is complete, it will prompt you to restart the machine.
Configure IIS
If the Shibboleth installation was successful, your Windows server should display the following settings in IIS:
In Control Panel, open Administrative Tools > Services. The Shibboleth service (Shibboleth 2 Daemon) should have Service = Started, Startup Type = Automatic and Logon As = Local System as the settings.
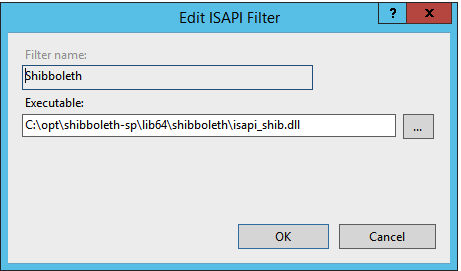
Open IIS Manager and verify that the Shibboleth ISAPI filter is installed.
Click the server name and open ISAPI Filters. The settings should be Name = Shibboleth and Executable =
C:\opt\shibboleth-sp\lib64\shibboleth\isapi\_shib.dllfor a 64-bit install.Configure this manually if missing.
Still in IIS Manager, verify that the Shibboleth ISAPI filter is mapped to the .sso extension.
Click the server name and open Handler Mappings. The settings should be Path =*.sso, State = Enabled, Path Type = Unspecified, Handler = IsapiModule, Entry Type = Local.
Configure this manually if missing by following this instruction:
Click Add Script Map in the Action pane and filling in the dialog box to match the server, with Request path = *.sso and Executable =
C:\opt\shibboleth-sp\lib64\shibboleth\isapi\_shib.dllfor a 64-bit install. The Name field can be anything you like.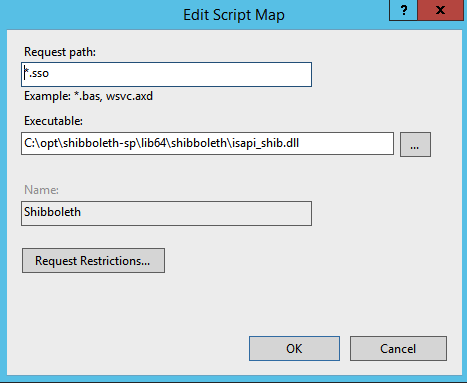
Still in IIS Manager, verify that the handler mapping inheritance properly cascaded down to the website level.
Click the website name under Sites, then open Handler Mappings. The settings should be Path =*.sso, State = Enabled, Path Type = Unspecified, Handler = IsapiModule, and Entry Type = Inherited.
If the *.sso entry mapping is missing, you will need to create it.
in a web browser on the server, go to the case-sensitive URL
https://localhost/Shibboleth.sso/Status, but do not substitute your server’s full domain name in place of /localhost/. If everything is properly configured, it should return an XML document with<Status><OK/></Status>at the bottom.
Configure Shibboleth SP
Configure SP
Open shibboleth2.xml
c:/opt/shibboleth-sp/etc/shibboleth/shibboleth2.xmlChange the
<InProcess>- and<RequestMapper>-tags so they look similar to the example below. Make sure to set correct values for Site ID and name.-
<InProcess> <ISAPI normalizeRequest="true" safeHeaderNames="true"> <Site id="3" name="service1.company.org"/> <!-- <Site id="4" name="service2.company.org"/> --> </ISAPI> </InProcess> -
<RequestMapper type="Native">
   <RequestMap>
      <Host name="service1.company.org" applicationId="service1" authType="shibboleth" requireSession="true">
      <!-- <Host name="service2.company.org" applicationId="service2" authType="shibboleth" requireSession="true"> -->
      </Host>
   </RequestMap>
</RequestMapper>
Add the following between the
<CredtentialResolver>and</ApplicationDefaults>-tags. Make sure the id matches the applicationId and entityID matches the SPs entityID.-
<ApplicationOverride id="service1" entityID="https://service1.company.org/shibboleth"/>
<!-- <ApplicationOverride id="service2" entityID="https://service2.company.org/shibboleth"/> -->
Configure how the IdP-metadata should be consumed by configuring the
<MetadataProvider>-tag.URL example:
<MetadataProvider type=”XML” validate=”true” url=”http://federation.org/federation-metadata.xml” />File example:
<MetadataProvider type=”XML” validate=”true” path=”idp.xml”/>- In this case the file idp.xml is placed in the
c:/opt/shibboleth-sp/etc/shibboleth/folder
- In this case the file idp.xml is placed in the
Find the
<SSOtag in the file and add your IDP to allowed IDP-
<SSO entityID="<EntityID of your IDP>">
  SAML2
</SSO>
OPTIONAL – Adjust the element “Sessions” If a local logout, including a redirect is supposed to be made, example
-
<Sessions lifetime="28800" timeout="3600" relayState="ss:mem"
checkAddress="false" handlerSSL="false" cookieProps="http"
redirectLimit="exact+whitelist" redirectWhitelist="https://idp.company.local/saml/authenticate/logout/">
Save the file.
Attribute mapping
The file attribute-map.xml in the same folder as shibboleth2.xml controls which SAML assertion attributes should be added as server variables.
To add an attribute mapping, simply add this to the file.
<Attribute name="<attribute_name_in_attribute_statement_of_saml_assertion" id="target_http_header_name">
        <AttributeDecoder xsi:type="StringAttributeDecoder" caseSensitive="false"/>
</Attribute>
Example:
<Attribute name="sAMAccountName" id="userid">
        <AttributeDecoder xsi:type="StringAttributeDecoder" caseSensitive="false"/>
</Attribute>
Save the file.
Restart shibboleth sp service in services.msc.
Start and elevated command promt and do an iisreset.
Import SP-metadata to IdP
Open PhenixID Configuration Manager and login
Go to Scenarios->Federation
Click the plus next to SAML Metadata upload
Enter a display name = “ Shibboleth SP“
Use this URL to retrieve the Shibboleth SP SAML 2 metadata xml:
https://<shibboleth\_server>/Shibboleth.sso/Metadata
Test
- Browse to
https://<shibboleth_server>/[path to application]/ - This should result in a redirect to PhenixID Authentication server
- Authenticate
- If authentication was successful, a redirect to application should occur (with SAML assertion converted to server variables)
- The user should now be logged in.
Verify
Check which headers are forwarded to the Federation application
https://<shibboleth\_server>/Shibboleth.sso/Session
If you want to see the content of the attributes, change the parameter showAttributeValues in shibboleth2.xml to true.
Logout
In order to logout from the Federation application, please use this link:
https://<shibboleth\_server>/Shibboleth.sso/Logout