Milou by Medexa MFA and SSO with PhenixID Authentication Services
Warning
Please note, this document is using the legacy authenticators - in order to use the new protocol agnostic authenticators, you need to apply relevant modifications to the configuration examples outlined in this article.
Summary
This document will guide you through the steps to enable multi-factor authentication and SSO for the hospital CTG data management system Milou ( https://www.medexa.se/en/milouenglish/)
System Requirements
- PhenixID Authentication Server 3.0 or higher
- Milou system administrator technical contact
Instruction
Configure PhenixID Authentication Services as Identity Provider
Setup PhenixID Authentication Services as a SAML IdP.
Go to Scenarios->Federation-><YOUR_IDP>->Identity Provider
Add a Post SLO url:
https://<your\_phenixid\_domain>/saml/authenticate/logout/This integration has two options regarding SAML attributes:
Using commission ( Medarbetaruppdrag: Medarbetaruppdrag (Commisions))
Not using commission ( Medarbetaruppdrag)
Your organization will decide.
With option #1, a commission-selector must be added to the IdP flow. Please contact PhenixID for support.
Go to Scenarios->Federation-><YOUR_IDP>->Execution Flow
To populate the SAML assertion with the correct data, please make sure to fetch these attributes: (How the attributes are fetched will differ based on your environment / user stores etc).
Using commission:
- givenName
- employeeHsaId
- sn
- occupationalCode
- healthcareProfessionalLicense
- systemRole
- commissionHsaId
- commissionName
- commissionRight
- commissionPurpose
- healthCareUnitHsaId
- healthCareUnitName
- healthCareProviderHsaId
- healthCareProviderName
(For more infomation about these attributes, please view the sambi attributes specification.)
Not using commission:
- givenName
- employeeHsaId
- sn
- occupationalCode
- healthcareProfessionalLicense
- systemRole
(For more infomation about these attributes, please view the sambi attributes specification.)
Make the following adjustments to the execution flow.
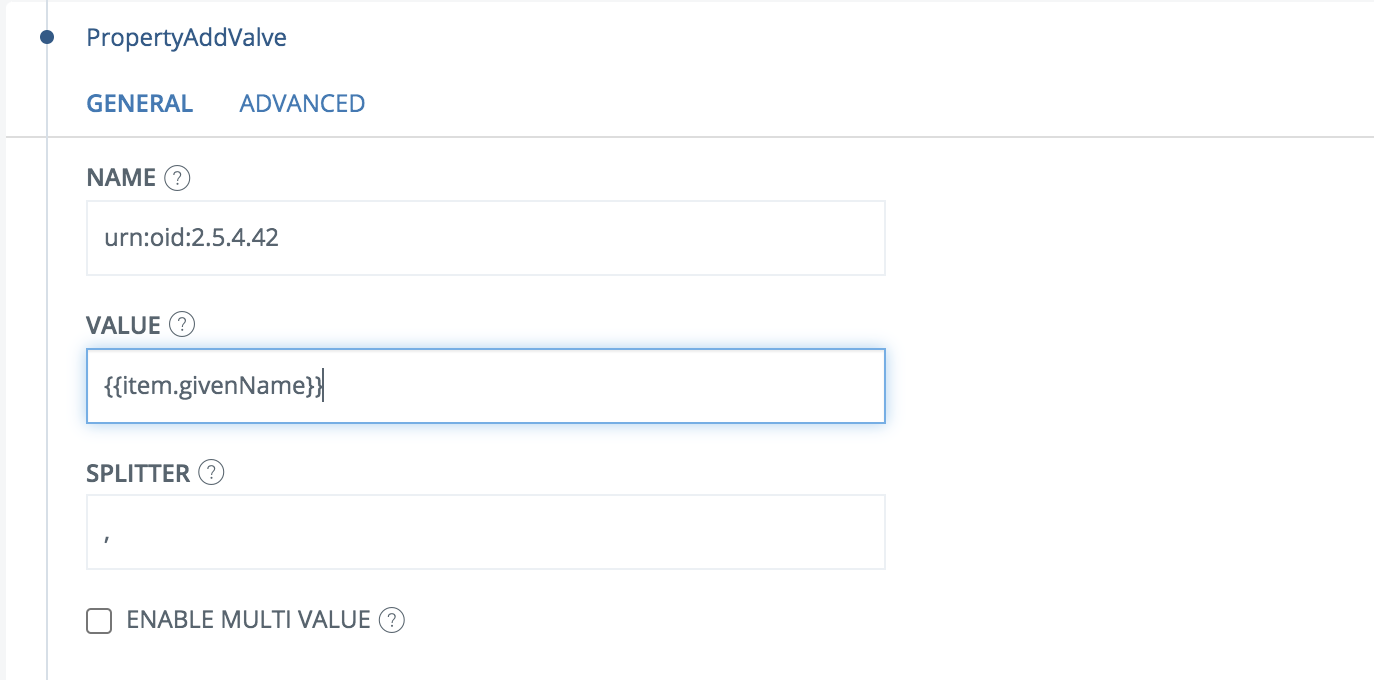
Add a PropertyAddValve for each attribute above where name =
urn:oid-name-for-each-attributeand value ={{item.<name_of_the_attribute_above>}}.Example:
The urn-oid-values should map according to this list:
urn:oid:2.5.4.42(givenName)urn:oid:1.2.752.29.6.2.1(employeeHsaId)urn:oid:2.5.4.4(sn)urn:oid:1.2.752.221.100.1.1(occupationalCode)urn:oid:1.2.752.116.3.1.3(healthcareProfessionalLicense)urn:oid:1.2.752.29.4.95(systemRole)urn:oid:1.2.752.29.6.12.1(commissionHsaId)urn:oid:1.2.752.29.6.12.2(commissionName)urn:oid:1.2.752.29.4.124(commissionRight)urn:oid:1.2.752.29.4.125(commissionPurpose)urn:oid:1.2.752.29.6.13.1(healthCareUnitHsaId)urn:oid:1.2.752.29.6.13.2(healthCareUnitName)urn:oid:1.2.752.29.6.10.1(healthCareProviderHsaId)urn:oid:1.2.752.29.6.10.2(healthCareProviderName)
(For more infomation about these attributes, please view the sambi attributes specification.)
Place all of the PropertyAddValves before the AssertionProvider.
Click AssertionProvider
Set NameID Attribute =
urn:oid:1.2.752.29.6.2.1Set additional attributes based on the options above.
Option #1:
urn:oid:2.5.4.42,urn:oid:1.2.752.29.6.2.1,urn:oid:2.5.4.4,urn:oid:1.2.752.221.100.1.1,urn:oid:1.2.752.116.3.1.3,urn:oid:1.2.752.29.4.95,urn:oid:1.2.752.29.6.12.1,urn:oid:1.2.752.29.6.12.2,urn:oid:1.2.752.29.4.124,urn:oid:1.2.752.29.4.125,urn:oid:1.2.752.29.6.13.1,urn:oid:1.2.752.29.6.13.2,urn:oid:1.2.752.29.6.10.1,urn:oid:1.2.752.29.6.10.2Option #2:
urn:oid:2.5.4.42,urn:oid:1.2.752.29.6.2.1,urn:oid:2.5.4.4,urn:oid:1.2.752.221.100.1.1,urn:oid:1.2.752.116.3.1.3,urn:oid:1.2.752.29.4.95
Save
Go to Scenarios->Federation-> <newly_added_scenario> -> Identity Provider. Deselect “Require signed requests”.
Save.
Then export your SAML IdP metadata by going to the URL:
https://<YourServerDomainName>/saml/authenticate/<authenticator_alias>?getIDPMetaand download the metadata to a xml file.
Configure Milou
- Send the downloaded IdP metadata to your Milou contact.
- The Milou contact will now configure Milou and send a SAML SP metadata file.
Add Milou as trusted Service Providers in PhenixID Authentication Services
- Login to configuration manager
- Scenarios->Federation
- SAML Metadata upload
- Add the Milou SAML SP metadata file.
Test
Browse to Milou.
You should be redirected to PhenixID Authentication Services.
Authenticate (with or without commission-selection based on the organization setup).
You should be redirected back to Milou.
You should now be logged in to Milou.